Showing posts with label MAC. Show all posts
It's been a hectic week in Bangkok. I just have not had the time to post. I've been exhausted every single night and slept like a log even though the beds were extremely hard. As in we've put a blanket over a piece of plywood hard. It seems to have been quite good for my back though.

We spent a lot of time shopping. We ended up spending three days exploring MBK, which is the really big centre with over 2500 shops. On the first day we were there and only got through 2 floors. Seriously.

We also found the Siam Discovery building which had a Madam Tussuad's so we had to go in there for the corny poses. They also had some more upmarket makeup brands like Bobbi Brown and Shu Uemura. There was also the Siam Centre where I found a MAC store, Smashbox, Etude House and a heap of boutique makeup and skin care places that I went nuts in. I now have 6 new MAC shadows, another paintpot, lots of BB creams and related products, assorted eye shadows and an AMAZING Etude House polish.

At MBK I found lots of places selling fake MAC products and fake MAC and Bobbi Brown brush sets (actually, the Bobbi Brown brush sets were surprisingly good quality, but quite good brushes if you're not ready to plunge head first into expensive brushes). There were fake designer handbags and wallets galore and while you know they are fakes, they are also well made and with actual good quality leather so I couldn't pass up on getting a few of those.

There is also a Japanese department store called Tokyu which had a few brands I hadn't heard of so I ended up getting four shadows from there just to give them a try. I also found the most adorable limited edition Hello Kitty Maybelline Mascara that I just had to have.

The food here is divine as you would expect and I am getting used to the burning in my mouth and my lips going numb.


We went on a full day tour on Tuesday which involved riding elephants (and seeing baby ones!), rafting on a rickety bamboo raft and visiting the famous bridge over the River Kwai. It was a long day, but an incredibly memorable one. Our elephant was big on walking and snacking at the same time, which was amusing. Our driver man was really cool and grabbed my camera and jumped off and started taking photos for me, which was fabulous. Considering he'd never seen any kind of camera beyond a point and shoot before he did pretty well. And he quite enjoyed learning how it worked.

I went to a ladyboy cabaret and it was awesome. It was so camp and hilarious. The best way to describe it is to imagine a badly dubbed movie, thow in some ladyboys, sequins and big hair and that's the result. I don't have any photos of that since I didn't think I would be allowed to take my camera in, but I can tell you that some of them I would not have picked. They were stunning. Quite a few were mannish and in dire need of a wax, but all in all it was fairly impressive. I'm planning on hitting another cabaret before I head home, so I will endeavour to take pics there.

The grand palace in Bangkok. The only half decent photo I managed to get on the cruise.

Last night was our final night in Bangkok and we did a night cruise and of course, it poured torrentially with rain making it impossible to take photos. While waiting for the cruise to start we killed some time in the bar with cocktails and watched an Asian Elvis impersonator who was really quite good if not under appreciated by the somewhat snobbish clientele.


We flew into Koh Samui this morning and are staying at the Outrigger, which is breathtaking. I've got so many photos that I have taken today, but I will just pick my faves. There are three pools here. Our room overlooks one of them and we have our own private spa on the deck which is awesome. Now, if we could just figure out how to work the damn thing....


I've just had dinner and it was incredibly tasty. I had stir fried chicken with cashews in a spicy brown sauce and Kim (my housemate/ travel buddy) had Massaman Curry. It was tasty too. Oh, and the most amazing smoothie which had yoghurt, honey, banana and pineapple.

There is a tropical storm going on outside so we are staying in tonight after a day of lounging on sun lounges, swimming, sitting in the spa and of course drinking cocktails at the swim up bar in the infinity pool. Ah...it's a hard life, but someones got to do it.

That's it from me today.

Be awesome to each other.
OH. MY. GOD.

I maybe a little behind on the times here but have you seen the pictures floating around on the net of the new Spring collection for MAC? WONDER FREAKING WOMAN!


I need them all. Like now.

Check it out!!!

MAC Wonder Woman Collection for Spring 2011


Penultimate Eye Liner - Rapidblack
$18.50 US
Valiant Eyeshadow Quad
L-R Manila Paper, Valiant, Diana Undercover, Spinning Transformation
$40.00 US
Defiance Eyeshadow Quad
L-R Defiance, Paradise Island, Star Studded, Real Drama
$40.00 US

Lady Justice Eyeshadow Quad
L-R Lady Justice, Insurmountable, Deep Truth, Bold Babe
$40.00 US

Lipstick  L-R
Marquise d' - Sandy cream peach (Lustre)
Russian Red - Intense bluish-red (Matte)
Spitfire - Bright creamy magenta (Satin
Heroine - Brown bronze (Frost)
$15.50 US

Opulash Mascara
L-R Victorious (purple), Army of Amazons (green), Themyscira (blue), Black
$15.00 US

Clockwise from upper left -
Utility Belt Eye Brush Set - inc 224SE, 213SE and 194SE
$49.50 US
Utility Face Brush Set - inc 129SE, 109SE and 190SE
$49.50 US
Invincible Mirror
$20.00 US
Wonder Woman Makeup Bag in Wonder Woman Red and Bulletproof Blue
$30.00

Mineralise Skinfinish L-R
Pink Power - Peachy rose with pink shimmer/ Soft rosy bronze/ Soft shell pink with fine shimmer
Golden Lariat - True coral with fine gold shimmer/ Soft suntanned bronze/ Soft gold with fine shimmer
$35.00 US

Blush Duo
Amazon Princess - Bright yellow-pink (Satin)/ Deep blue pink with gold pearl(Satin)
$24.00 US

Blush Duo
Mighty Aphrodite - Warm peach coral (Satin)/ Bright coral pink with gold pearl (Frost)
$24.00 US
Lipglass L-R
Emancipation - Pale neutral pink
Wonder Woman - Bright red with soft pearl
Athena's Kiss - Bright blue-fuchsia
Secret Identity - Mid-tone copper with soft pearl
$19.50 US

Nail Lacquer
L-R Obey Me, Spirit of Truth
$14.00 US

L-R
Reflects Glitter
Reflects Pearl - White glitter with pearl sheen (Glitter)
Reflects Bronze - Sparkling rich gold (Glitter)
$21.00 US
Pigment
Bright Fuchsia - Bright magenta
Marine Ultra - Vivid marine blue
$21.00 US

I love the packaging on these and am totally envious that the Disney VV collection didn't have branded pigment jars, or polish bottles! That would have been all kinds of awesome.

This is due to launch Feb 10, 2011 for Canada and the US and March for all of us who are international.

Don't forget to enter my giveaway which is open for entries until the end of the month.

That's it from me today.

Be awesome to each other.
In my massive box of polishes Jess sent over were all but one of the OPI Burlesque Collection, however I managed to track down the missing one on my end. I have never really gotten whole collections where there are more then a half dozen polishes before because to either buy them here, or in an online store and get them shipped is usually way too expensive, especially if you consider the one or two duds that a large collections invariably contains. The Burlesque Collection is a rarity in that I can't see a single dud in there.

I've decided to start off the swatching with the one I reached for straight away - The Show Must Go On.


It is a deep pinky-red, perhaps a dark coral more so then pink with a stunning gold duochrome to it. I was having a really hard time capturing that in these images. Scrangie managed to get some decent photos of the colour, but I think she was having issues capturing the gold as well. It is really noticeable in person, both in the bottle and on the nail.

A stunning, stunning colour. Like the rest of the non-glitter colours in this collection, this one has the glass fleck like effect that is produced by what I think is a large particle shimmer throughout the polish. It comes out all kinds of sparkly on your nails and the colour is simply to die for.

Before any of you ask - Is this a dupe for MAC Bad Fairy? I have swatched them side by side (but didn't take photos for some stupid reason) and they are similar in that they are both redish based polishes with strong gold duochrome to them but that's about it.
Bad Fairy uses a much darker red base from what I can tell and the gold shimmer is much more obvious in it. The MAC polish is like being punched in the face with duochrome and can often give the polish a orange tone at a quick glace whereas TSMGO has a much more subtle gold flash. It is most definitely there, but it is not so in your face and you can tell at all times that it is meant to be a primarily red based polish.

This a full mani with two coats of TSMGO, one coat of Seche and a cute butterfly decal in between. Please excuse the tip wear, I had been wearing this one for a couple of days before I took any photos. 

If you haven't already, please enter my Christmas/ New Year Giveaway. I added a 6 pack of polishes from UNT Skincare yesterday and there will be more prizes going up soon.

That's it from me today,

Be awesome to each other.
I'm back with the second lot of my MAC Venomous Villains haul. I got four Lipglasses. Here are the swatches and pictures.

Devilishly Stylish
This is Devilishly Stylish from the Cruella range. It's a nude pinkish champagne. Very user friendly. Adds a shimmer and sparkle to your lips without being over the top. Very complimentary on any skintone I would think.


 Wicked Ways
Wicked ways is also from the Cruella range. It is a cherry red that has a subtle goldish(?) shimmer. It looks patchier in person then it looks in the picture. It's a bit too think to be a full lip colour and a bit too thick to be a gloss. It looks great over a red lipstick base or even over lip liner filled in lips. Being a strong colour, it was hard to apply so that I liked the shape. The sheerer glosses allow room for error, a red does not. Ever.


Hot House
Hot House is part of the Evil Queen collection. It's an interesting colour. It's a fuchsia-purple with a strong glitter flash/ shine. Which you can see in the swatch below. The glitter is almost holographic looking in person, but glitter is described as being an iridescent fuchsia shimmer. It is a semi opaque gloss and I am still unsure whether I love it or hate it. I believe it was originally released under the name Strange Hybrid.


Revenge is Sweet
Revenge is Sweet is an interesting one. The most intriguing of the bunch to me. It was released as part of the Maleificent collection, which is my favourite of the bunch. It looks so dark and threatening in the tube. Not a colour I could pull off. But then you swatch it and it is actually a very sheer jelly like pink with a strong fuchsia micro shimmer. Very wearable. Very glossy.


So those are the Lipglasses I picked up. Any favourites? Any I should have gotten but didn't?


That's it from me today.

Be awesome to each other.
I've just realised that I haven't shown you guys anything at all that I got from the Disney Villians collection, which is heaps. I'll work on fixing that over the weekend. Promise.

Here is the first of the polishes and some dodgy photos. I don't know why I didn't check these before I took the polish off, so I will reswatch these eventually. It was a pita trying to capture the colours in this one. The duochrome would just not place nice with my camera.

It reflects a reddish purple, blue, violet and teal that I can see. I've seen pictures that shows this polish as a dead on dupe for Orly Galaxy Girl, so it might be healthier for your bank balance to buy the Orly version. Still an awesome polish though. 


My new Ozotics polish giveaway is up and running. Enter here for your chance to get you hands on some HTF Aussie gems!

Short and sweet, but that's it from me today.

Be awesome to each other.


STEP-BY-STEP
  1. Use Brush #188 to prep and perfect skin with Prep + Prime Skin.

  2. Use Brush #191 to apply Chromacake in Pure White to the entire face, including the neck area.

  3. Lightly sketch the “wave” design on the face with Fascinating Eye Kohl.

  4. Outline and shade the design details with Smolder Eye Kohl and Blacktrack Fluidline, using Brush #212.

  5. Use Brush #217 to apply Carbon Eye Shadow over the design in order to set with a matte finish.

  6. Use Brush #208 and Blacktrack Fluidline to elongate and define eyes. Follow by using Brush #239 to blend Carbon Eye Shadow over both eyelids.

  7. Apply Lash #36 on the upper lashline and Lash #33 on the lower lashes to open up eyes.

  8. Define the lip with Blacktrack Fluidline.

FACE
Lightful Foaming Cream Cleanser
Studio Moisture Fix Lotion
Prep+Prime Skin
Chromacake - Pure White (PRO)
Eye Kohl - Fascinating

EYES
Eye Kohl - Smolder
Eye Shadow - Carbon
Fluidline - Blacktrack

LIPS
Prep + Prime Lip
Lipstick - Black Knight (Style Black Collection)

STEP-BY-STEP
  1. Perfect the skin using skincare, Prep+Prime Skin and Face and Body Foundation, for specific skintone and texture.

  2. “Pow” and “Bang” Sections: Use Brushes #210, #231, and #219 to apply Blacktrack Fluidline for the animation outline and text. Fill in “Pow” with Passionate Eye Shadow and “BAM with Electric Eel Eye Shadow. Use Fluidline in Waveline to create animated dots.

  3. Create smokey eye by applying Paint Pot in Blackground along the eyelid and diffuse into the crease for a graphite contour. Blend Carbon Eye Shadow over Blackground to deep and set.

  4. Line the inner rim of the lower lashline with Technakohl in Graphblack, and blend through the lower lashline.

  5. Blend Copperplate Eye Shadow through the crease and lower lashline for a seamless smokey effect.

  6. Use Espresso Eye Shadow to create a fuller, 1950’s inspired brow. Use Eye Brows in Spiked to create a crisp, clean look of precision. Apply Vanilla Eye Shadow under brows for a strong highlight.

  7. Blend Lashes #2 and #3 on the upper lashline for more volume and density. To perfect the look, add Lash #30 in different lengths along the lower lashline.

  8. Define the lip with a blend of Cherry and Vino Lip Pencils, and then follow with Brush #316 to apply Lady Danger Lipstick. Finish the lip with a generous coat of Clear Lipglass.

FACE
Wipes
Strobe Cream
Fast Response Eye Cream
Prep+Prime Skin
Face and Body Foundation
Select Moisturecover
Mineralize SkinFinish Natural
Eye Shadow - Vanilla
Bronzing Powder - Bronze
Green Gel Cleanser
Eye Shadow - Electric Eel
Eye Shadow - Passionate
Fluidline - Waveline, Fluidline

EYES
Eye pencil - Coffee
Eye Brows - Spiked
Eye Shadow - Vanilla , Carbon, Copperplate, Passionate
Paint Pot - Blackground
Technakohl Liner - Graphblack
Zoomlash - Zoomblack

LIPS
Prep+Prime Lip
Lip Pencil - Cherry, Vino
Lipstick - Lady Danger
Lipglass - clear

STEP-BY-STEP
  1. Start out on your clean face. Lightly buff a thin layer of Luna Cream Colour Base all over your skin with a #187 brush. Set it with Gesso Eye Shadow and a #116 brush - pressing the Eye Shadow in rather than buffing it.

  2. Using Blacktrack Fluid Line and a #266 brush - paint in your eyeliner and brows - don’t be afraid to experiment with painting an expression on.

  3. Sculpt your cheek bones with a bit of Concrete or Omega Eye Shadow and paint your lips a daring red.

  4. Finally, find a chopstick or something in your house with a small round shape that you can use as a stamp. Scrape some Passionate Eye Shadow onto a small kitchen plate. Mix some Fix+ into the scraped shadow - make it not too watery and then dip your stamping tool into it and go to town with your dots.
FACE
Studio Moisture Fix
Cream Colour Base - Luna
Eye Shadow - GessoLipstick - Russian Red
Fix+

EYES
Fluidline - Blacktrack
Eye Shadow - Gesso, Passionate, Omega
Eye Kohl - Fascinating
Zoomlash - Zoomblack

LIPS
Prep + Prime Lip
Lip Pencil - Cherry
Lipstick - Russian Red, Black Knight (Style Black Collection)
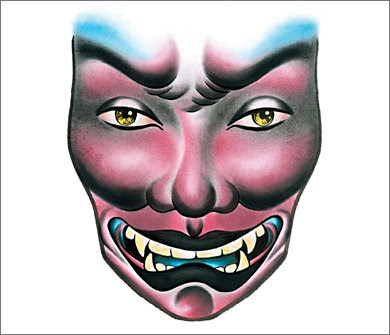
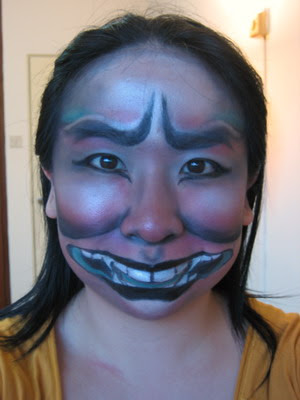
This one is really cool. The girl who did this did an awesome job. I got the photo from this site. But, seriously check out her before and after photos, they are amazing.


STEP-BY-STEP

1. Hydrate and prepare skin with Prep + Prime SPF Protect 50 and a light layer of Studio Moisture Cream.

2. Begin shading the face with Frankly Scarlet Powder Blush and highlighting with Gesso Eye Shadow, use Brushes #109 and #217 for a precise application of color.

3. Continue to deepen contours of Frankly Scarlet with Carbon Eye Shadow, and Brush #217.

4. Use Boot Black Liner to draw details of brow, nose, cheek, lips, and eyelining effects. Follow creating shadows with Carbon Eye Shadow and Brushes #213 and #219.

5. Use Brush #217 to apply Electric Eel Eye Shadow over the brows through the temples, and Brush #228 to create details on the mouth and teeth.

6. Create teeth and fangs with Lip Erase, Lipmix and Black Knight Lipstick.


FACE
Cleanse Off Oil
Studio Moisture Cream
Prep+Prime Face Protect
Prep+Prime Line Filler
Studio Stick
Blot Powder/Loose
Studio Finish SPF 35
Eye Shadow - Carbon, Gesso
Powder Blush - Frankly Scarlet


EYES
Eye Kohl - Smolder
Brow Set - Clear
Eye Shadow - Carbon, Gesso, Electric Eel, Gesso, Passionate
Paint Pot - Painterly
Liquid Eye Liner - Bootblack

LIPS
Lipstick - Shag, Black Knight (Style Black Collection)
Lipmix – Yellow, Blue (PRO)
Lip Erase - Pale (PRO)
Powerpoint - Gilded white
I am going to try add pics of people wearing the design were possible, so check back on some of the others to see.
I think this is my favourite I have come across, and it looks pretty easy to boot.


STEP-BY-STEP

1. By crushing Gesso eye shadow mixed in with Eye Liner Mixing Medium, you can paint your face white. Another option is to use white Paintstick from the M·A·C PRO line.

2. It is important to have references of zebra stripes handy to study the pattern. I used Blacktrack Fluidline with a #210 brush to create the pattern of zebra on my models face.

3. Doubling up on #37 lashes can create a dow eyed animalistic eye.

4. Prep+Prime Transparent Finishing powder will seal the deal.


FACE
Green Gel Cleanser
Studio Moisture Cream
Prep+Prime Skin
Face & Body
Select Moistureblend
Studio Sculpt Concealer
Eye Shadow - Gesso & Eye Liner
Mixing Medium
Prep+Prime Transparent Finishing powder


EYES
Fluidline - Blacktrack
Eye Kohl - Fascinating
Penultimate Liner
Eye Shadow - Carbon, Vanilla
Plushlash - Plushblack


LIPS
Lip conditioner mix with Powerpoint Eye Pencil - Guilded White
Lipstick - Pretty Please, Black Knight (Style Black Collection)
Day of the Dead


STEP-BY-STEP

  1. Hydrate and create a luminous finish on skin with a spritz of Fix + and Strobe Cream.

  2. Use a powder brush to dust White Frost Eye Shadow all over the face, concentrating the strength over the high planes.

  3. Draw the outline of the skull design with Blacktrack Fluidline and Brush #228.

  4. Use Brush #109 to shade Electric Eel Eye Shadow over the contours of the face within the skull design.

  5. Use Brush #228 to apply Blacktrack Fluidline to outline and shade the eye sockets, and switch to Brush #210 to continue with Blacktrack to create the details over the forehead, browbone, nose, cheek, mouth, and chin.

  6. Use Brushes #219 and #311 to fill in details with correlating Eye Shadows in Passionate, Chrome Yellow, Purple Haze, Juxt, and Orange.

  7. Use Powerpoint in Industry and Scene Eye Shadow to shade in teeth. Outline with Black Knight Lipstick

  8. Finish finessing details with Boot Black Liner.

FACE
Green Gel Cleanser
Strobe Cream
Prep+Prime Skin
Eye Shadow - White Frost, Orange Juxt, Electric Eel, Passionate, Carbon, Chrome Yellow, Purple Haze
Liquid Last Liner - Inkspill
Fix +

EYES
Liquid Eye Liner - Bootblack
Eye Shadow - White Frost, Juxt, Carbon, Electric Eel
Fluidline - Blacktrack

LIPS
Powerpoint - Industry, Gilded White
Lipstick - Black Knight (Style Black Collection)


STEP-BY-STEP
  1. Block out the eyebrows with MAC Studio Sculpt Concealer.
  2. Sketch out the card shape around the eye…use an actual playing card to get the right shape and trace it with Fascinating Eye Kohl.
  3. Fill in the card with Luna Cream Colour Base and cover with White Frost Eye Shadow.

  4. Add card details with Blacktrack fluidline.

  5. Cover face with Studio Sculpt Foundation.

  6. Use Blacktrack Fluidline and Mystery Eye Shadow to create the ultimate smoky eye.

  7. Add lashes to top and bottom of eye with Duo Adhesive.

  8. Using Lasting Lust Pro Long Wear create a heart shape on the lips!

FACE
Wipes
Studio Moisture Fix
Prep+Prime Skin
Studio Sculpt Foundation
Studio Sculpt Concealer
Blot Powder/Pressed - Medium DarkPowder
Blush - Dolly Mix, Desert Rose


EYES
Studio Finish Concealer
Fluidline - Blacktrack
Eye Shadow - Carbon, Soft Brown, Mystery, Bamboo, White Frost, Passionate
Eye Kohl - Fascinating
Cream Colour Base - Luna
Penultimate Liner - Rapid black
Cremestick Liner - Red Enriched
Zoomlash - Zoomblack
Fibre Rich - All Black

LIPS
Lip Erase - Pale (PRO)
Cremestick Liner - Red Enriched
PRO Longwear Lip Colour - Lasting Lust
Dazzleglass - Extra Amps