Showing posts with label pink. Show all posts
I don't know about you guys, but more often than not, I want a lip product that applied smoothly, applies a subtle pop of colour that enhances natural lip colour and is easy to top up during the day. Low maintenance, cheap and cheerful and of course, super cute. I don't think I'm asking too much.

I'm a little late to the party on this one, but I'm sure many of you have noticed by now that glossy lip crayons are taking over the makeup sections in your nearby stores. So many brands, so many colours. So where does one start? You swatch them ALLLLLLLLL! All over your arm. And then forget about the line of colours up your arm and walk out of the store. Then about half an hour later you look down and realise your white top has turned into some kind of abstract coloured masterpiece. A smear of hot pink here, coral there, apple red a little bit further over. Yep, that happened. More than once. Just call me Becasso.

So, what did I find during my extensive research other than soaking said top in vinegar is the only way to get the colour (mostly) out? That my favourite ones were not the expensive high end pencils, rather the cheaper Glossy Lip Crayon by Face of Australia.


 They all have similar wear time, slightly different textures and some have higher levels of pigmentation, I guess it really depends on what you are after personally. It's much of a muchness with these products, so don't feel like you have to splurge on a Clinique Chubby Stick when you can get one that works the same for $5. Yep. $5.

Raspberry Coulis, Jam Fancy and Apple Crumble
 The FOA ones all have super cute names, which I love. And make me hungry. The ones I picked out - Apple Crumble, Raspberry Coulis and Jam Fancy (please excuse me while I take a sec to wipe the drool of my keyboard) are all totally wearable and appropriately pigmented to make them a must have handbag item. They apply smoothly, feel very moisturising and don't tend to highlight and lip nasties like dryness or chapped lips. One thing I will mention is that these do have a vanilla scent, so that is something to keep in mind if you react to things like that, or just plain don't like it.

L to R - Raspberry Coulis, Jam Fancy, Apple Crumble
I've been giving these a workout in my kit lately, giving them as a present to the flower girls of bridal parties I've been working on. Anyone who knows me, knows that I don't agree with children wearing makeup beyond a bit of gloss, and I'll also lightly apply blush to flower girls so they don't feel left out. And can I just say how much the kids and their parents are appreciating the gift? It makes the kids feel grown up, and they then seen to mimic the lead of the grown ups behaviour wise. Pretty great deal for $5 I say. So if you are looking for a way to start introducing a teen to makeup, this definitely could be the way to go.  

These can be found at Priceline, Big W and Kmart for $4.99 each and the collection currently has 7 colours. 

So, who has tried these? Or a similar one? What are your thoughts? Love it or leave it?
You guys seem to like it when I show you products on a budget that work as well as their pricier counterparts, so I think you are going to like what I have in store for you today.
I've spoken before about a brand called Ulta3 and how much I love their nail polishes and how surprised I was by the quality of them. They have recently revamped their makeup line and the first thing that caught my eye when walking past the new stands were the new lipstick containers. Gone are the cheap-looking plastic tubes and they are replaced with a sophisticated tubes with colour panels on the bottom which is what draws they eye.

You know what else is great about these? The price. $2.99 for the standard colours and $3.99 for the mattes. Yep, that's right, they have a range of matte colours. In a budget line. Awesome, right?

So you want to know how they look right? For the most part - they are terrific. A couple of them need a little work, but overall I was really impressed with the quality, opacity and the wear of them.


L-R: Vixen, Harem Pink(m), Lilac Glow, Orange Crush(m), Pure Chic, Pink Pout(m), Coral Reef


015 - Vixen
Terrific work appropriate colour if you like a little shimmer. Smooth, opaque and easy to work with.


030 - Harem Pink (matte)
This is the first of the three mattes and my favourite of them. While not a true matte lipstick, this can be forgiven because it also does not have the drying qualities most matte lipsticks do. Opacity is fantastic and it's a smooth cream finish.


007 - Lilac Glow
A blue based pink/purple, this one surprised me with it's wear-ability. Definitely not a colour for everyone but still a keeper.


029 - Orange Crush (matte)
Not a fan of this one. I can't say I expected a matte orange to be terrific or flattering but I was intrigued to see what the formula was like. The answer is terrible. Clumpy, a little drying, not opaque at all and building up the colour makes it look worse. There is nothing redeeming about this, and like Harem Pink, it's not actually a matte at all.


051 - Pure Chic
Again, another great work colour to add to the collection. No faults with this one, great application, opacity and wear.


033 - Pink Pout (matte)
This one is just ok, it's a little drying, not actually matte, great colour though.


040 - Coral Reef
I was so disappointed with this one. I was so excited about the colour and was so disappointed with the lack of colour payoff, the texture and the overall finish of the lipstick. Avoid this one.

I want to try a few more of these, definitely some reds, but I highly recommend these as a luxe option for less.

That's it from me today, I was thinking about putting together a post on contouring - is that something you would be interested in getting some insider tips on?

Continuing on with Swatch-a-palooza, here is a glimpse into my pro kit. I have 25 OCC Lip Tars. I had more but they inevitably get stolen on shoots by models and assistants once they realise how awesome they are, the most recent casualty - my black one - Tarred. Very annoying.

I'm not saying you need all these colours, hell you only really need primary colours, a black and white and you can mix any shade you like. I just like having premixed colours so that I don't have to spend as much time mixing, since I can grab something close to the shade I'm after and just add a little to change it depending on my needs.

So lets jump straight into the pictures.

L-R - Feathered, Butch, Chlorophyll, NSFW
As you can see, Feathered is not opaque in comparison to the others and is prone to the mixture separating. I use it only in mixing colours so it's not an issue for me, but if you are looking for a solid white lip colour, this is not the one you are looking for.

Heads up - these stain. Particularly the red NSFW which great for your lips, not so much your arm. I maybe had this one for 3 mins max to get this level of stain.

Tone, Hush, Trick, Uber, Pennyroyal

Devine, Grandma, Kava Kava

Memento, Narcissus, Pretty Boy, Anime

Digitalis, Pageant, Demure, Katricia, Belladonna

The purples also stain and quickly.

The new-ish metallic Lip Tars - Triptych, Electric Grandma, Super NSFW, Authentic. Love these!

One thing I find about OCC Lip Tars is that they can be incredibly drying on lips. I always prime with something really heavy duty like Paw Paw ointment and scrub the lips to remove any dead skin before applying these as they will emphasise dryness. I love that they dry to a matte finish and that once dry, they aren't going anywhere. The downside to this is that some of them stain pretty badly, namely the reds and purples.

A lip liner with these is an absolute must, as is being so careful that you don't use too much. I know some people think I'm exaggerating when I say that I use a pinhead sized drop of product for the whole lip area. I'm not. If you use anymore then that, the product will run and feather and will be a nasty mess. I've found that the people who dislike using Lip Tars and claim they can't see what the fuss is about are the ones who use a little too much.

This is a superb product but one you have to know how to use properly to achieve an amazing look. You need to have prepared your lips, exfoliated, primed and lined, before application.

These are phenomenal value for money at $18 each here and cheaper in the US. These will last a really long time and you can't fault the colour payoff, as you can see above.

My one gripe is that the packaging has a tendency to randomly explode leaving you will a sticky, highly pigmented mess to clean up. Luckily this has never happened to me (touch wood) but I have plenty of makeup artist friends who have lost a tube or two to a colour explosion in their kit. It's a devastating thing. I never leave mine in my main kit for that reason, only packing them when I know I need them. And always in a separate snap lock bag - just in case.

Do you have Lip Tars? Do you love them? Any tips you want to share?

Welcome to Swatch A Palooza 2013! This is were we are going to celebrate all things bright and colourful. I'll be swatching my entire polish collection by brand, as well as all of the makeup - and yes that includes my entire pro kit as well.

If you guys see something you like, speak up. Let me know if you want more info, a proper review, a comparison with similar brands or shades. I'm here for you guys, so you get to say what you want to see.

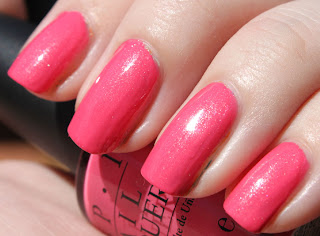
Let's kick it off with some OPI shall we?

Into the Night
The Amazing Spiderman Collection - 2012

Glizterland
Swiss Collection - 2010

Skull & Glossbones
Pirates of the Caribbean On Stranger Tides Collection - 2011

Grape... Set... Match!
Serena Williams Grand Slam England Collection - 2011

Flower to Flower
Summer Flutter Collection - 2010

And another of Flower to Flower to really see that shimmer through it.
Ok, so that's part one of OPI done. Only a billion more to go!

I'll be back later this week with more OPI swatches and also swatches of all of my OCC Lip Tars, so stay tuned.
So you guys seemed to like my first post on quality lipsticks for less so I thought I'd follow it up with a brand you probably haven't heard of because it's a Brisbane based makeup supply store who started their own line of products. And they are simply AMAZING.

The store and brand is called Makeup & Glow and is the brainchild of one of the best bridal makeup artists I have ever come across, Rachael Parnell. She noticed that there was a huge gap in the market for pro brands to be brought into Australia and made available to professional makeup artists.

So lets talk about the lipsticks. I have ten of them. 5 of the best sellers were provided for review and 5 I bought myself. I can honestly say that the quality of these blow my mind. I'm sure you guys want to know how much these are, and I would still pay for them if they were double or even triple the price. They are $5.95 each. Yes, really. If you don't believe me, go look for yourself.

You get a huge 37mm pan which is about the size of an actual lube of lipstick melted down. I know this because I do it all the time.

So first things first, lets start with the popular shades -

L-R - Bride to Be, Tango Pink, Salmon, Love Heart, Mother of the Bride, Red Brick


Bride to Be is an amazing dusty deep pink, which not surprisingly is a great bridal colour. I love using this colour for weddings because it's so easy to grab a backup pan and give it to the bride along with a disposable lip brush for touch ups during her big day. Opacity is amazing, it's super smooth, super creamy and really quite moisturising.


Salmon is exactly as it is named. A creamy, opaque salmon colour which is more flattering then you would think. I would call this almost a coral shade, but a lot more wearable for more people.


Tango Pink is a brighter version of Bride to Be. Still really wearable and work appropriate. Again, really creamy and opaque.


Love Heart is one of my favourites because I do love a hot pink lippie. It's a seriously fun colour and I love it.


Mother of the Bride is another really popular colour. It's a plum colour and it looks amazing on mature ladies as well as younger women.


Mulbury looks much deeper in the pan then it actually comes out in real life. This one has an almost glossy finish to it and I love using it to mix in to make a red lipstick a little more vampy without going for a solid purple lip. Also, I may have gotten a little excited and used this colour before I took a photo.


Brick Red is a really great colour. It's a deep, almost tomato red, but deeper. Think Campbell's Tomato Soup, that's what it reminds me of.

Now we are getting to the mixing colours.

L-R - White Orchid, Aztec Gold, Little Black Dress


White Orchid is creamy and a solid colour but it does require a little more product then the others to build up opacity, but that is to be expected and really, who wants to wear stark white lipstick? I use this to lighten custom mixed lipsticks all the time, making it one of the most used shades in my kit.


Same goes for Little Black Dress. Great mixing colour, needs a little more product for a solid lip coverage but when darkening a lip colour, a little goes a long way.


My absolute favourite of the collection is surprisingly Aztec Gold. I really didn't expect to love this the way I do. It applies like butter, BUTTER I say! A tiny bit for opacity, so creamy. LOVE!!!

Must haves? Well, I want the whole collection but from what I have here - Bride to be for the everyday look. Mulbery as a vampy colour and . Brick Red because everyone needs a red. Probably you don't NEED Aztec Gold, but you're going to want it really, really badly. And I think everyone should own a black and white lipstick for mixing purposes. It means that the lipsticks you already have can always be customised for your outfit or mood.

The colour longevity on all of these is amazing. I did a shoot this afternoon where I mixed about seven of the colours together to create the perfect shade and it lasted through 4 and a half hours of shooting and I didn't have to touch it up once. It applies evenly and well.

I really cannot say enough good things about these lipsticks other then I NEED ALL OF THEM!!!!

If you feel like you also need some (or all, hey I'm certainly not judging you for it!), the store is open to the public on Saturday mornings and 24/7 online at their website.

I've got pictures of these on the lips coming up shortly. Just as soon as I get some time and some sunlight to actually do it. More product reviews coming up soon as well!

Enjoy what's left of your weekend and be awesome to each other.
It's pouring here. Bucketing down. So what's a girl to do when it's a dark, wet and depressing? Organise her nail polish of course!


My collection is fairly large, but I know there is much bigger out there.

Pulling out the bottles and seeing all those colours and finishes makes me happy. You forget that you have some truly amazing polishes when they are tucked away in drawers all the time and you just grab the same colours over and over.

So here's what I'm going to do - swatch them all! Every single one. I think I will do them in brands as opposed to shades if that's ok with you guys, that way you won't be seeing pages of red, matte red, sparkly red, shimmer red, holo red. Not that there is anything wrong with that, but lets break it up a little shall we?

Now where do you want me to start?

As promised, here is the winner of my Ulta3 giveaway - MINTY! I've sent through an email and if I don't hear back within 48 hours I will redraw.


This is one of my very few Finger Paints polishes - Psychedelic Pop. I got it in a polish sale ages ago from the incredibly awesome Jess over at Polished Lyrics. Do you follow her blog? You totally should - she's a total sweetheart!


This is a bright Barbie pink creme and while I know that bright pink polishes are hardly a rarity, this is still one awesome polish. Two coats and it's opaque, the texture is smooth although it is a little on the thick side, which is not really all that surprising for a creme polish.  Despite this, it's still totally manageable so long as you apply two thin-ish coats as opposed to one thick coat which will work but won't look as good.

That's it for me today.

Be awesome to each other. 
Hi Guys! I am so, so sorry I haven't posted in a while. I have been so sick as well as packing up and then moving and also dealing with idiotic real estate agents whose main goal in life is to make my life hell, or at least that's how it seems.

I haven't painted my nails in over a week and the condition my nails are in after moving can only be equated to the kind of scary that you get when a clown jumps out of a drain at you.


This is a swatch from my archives. It's Orly Lola and was released as part of the Hot Stuff Collection. While the colour is nothing really unique I still quite like it, but I am a sucker for a hot pink. I do think this is more of a toe colour then a nail colour, just because there are so many more exciting polishes out there for my nails.


The formula is great, like every other Orly polish I have ever come across. This is two coats. The application is a mess because it is a mini bottle, and in all honesty, that was never going to end well with my man hands. Lol.

My Ozotic Polish giveaway is up and running. You can enter here. Thank you so much to everyone that has already entered.

That's it from me today.

Be awesome to each other.

This is the mani I was rocking for all of one day. I liked the effect a whole lot, but the striping tape kept peeling up even though I kept layering Seche over the top. The little buggers would just not stay put!

I used Sally Hansen Hi Res. The polish is brighter the same shade as the flash pic. I used my light box for these ones, but didn't let the bulbs get bright enough before I took the photo, I was just too darn impatient. I didn't notice until I saw the background was an odd yellow shade when I was editing the pics. Oh well, another lesson learned.


This three coats of Hi Res when dries pretty quickly. I had to work fast to apply the striping tape. The tape itself is what makes the mani awesome. It's a striped black and silver tape. The reason it does not sit down is because it is a twisted design. It's called Silver Fox and it's a laser blend striping tape.


Here is the promo pic for it. I got it from Dollar Nail Art. I also ordered a heap of foils, but cannot for the life of me make it work on the tips of my nails. It just will not stay on the nail. Any tips on foils? Anyone have the same issues?


By the time I had applied the individual strands with tweezers I was pretty over it, so I decided to crack out China Glaze Bad Kitty which is a Pink Glitter polish that works well as a top coat. Easy and brings a whole new look to the SH polish.


If you haven't entered already, here is the link to my MAC Giveaway.

That's it from me.

Be awesome to each other.